How To Change Permission On Mac For System Folder Mac Os Sierra
Steps for Change Folder or image size on Finder from Mac: MacOS Sierra, EI Capitan. 1: Open Finder on Mac. Go to your Folder that you want to increase the size of files, Folders, and Images. 2: From Top menu options, Click on View > Show View Options or Command + J shortcut. Or Right click on Folder > Show View Options. If you are using OS X Yosemite or earlier, do the following: Go to Applications folder → Utilities folder → Open Disk Utility. Select the disk from the list. Click the First Aid tab. Click Verify Disk Permissions to check the settings. If you need to repair permissions, click Repair Disk Permissions.
How to make bootable USB windows 7. You can also make bootable USB drive on Windows 7 using the same method Windows 7 is a personal computer operating system developed by Microsoft. It is a part of the Windows NT family of operating systems. Use your Ubuntu desktop to create a bootable USB stick that can be used to run and install Ubuntu on any USB-equipped PC. How to write a USB stick with macOS. To create this bootable USB drive, also known as a live USB, you will need access to a USB drive with at least 2 GB of storage and a functioning computer, but it does not matter if it is a Mac or Windows. 
Hey Sometimes you may want to change the permissions of subfolder and all of there files. This could be down to the simple need to enable them to be read only for part of a server network or in my case allowing files and subfolders and files to be read and write for website development. Its took me a while to figure out how to do this, and it is blindingly obvious. If you right click on any folder or file and select Get Info you will see a pane of information as you would expect.

If you then click the pad lock and enter your admin password you will be able to edit the folder permissions at the bottom. Photo editing program for mac. The problem with this is that it only changes the folder you are on. This can be a real problem if you have hundreds of files and folders that you want to enable specific settings, you would have to go through each one and change it by hand. The solution is to click on the tiny cog at the bottom of the pane, almost hidden away.
Clicking Apply To Enclosed Items will set the permissions to what you have changed above to every single item. It will come up with a warning message saying if you want to change them or not.
It will then whir away for a couple of seconds based on how many files and folders it has to change and then you will be done. If you want to change them back simply change the permissions in the list and apply it to the items once again.
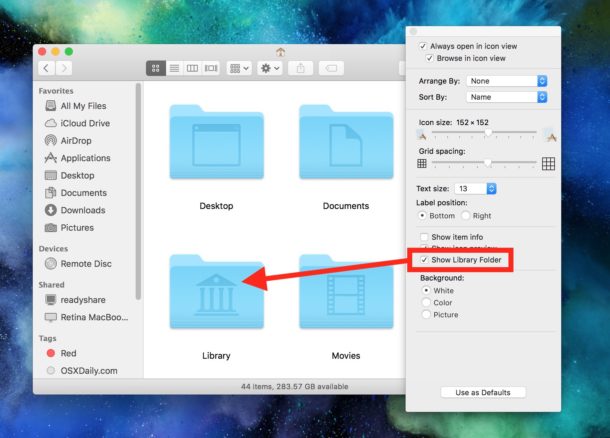
To unhide your Library folder in macOS Sierra, launch Finder and navigate to your user Home folder (you can jump directly to your user folder by select Go > Home from the Finder’s menu bar or using the keyboard shortcut Shift-Command-H). With your Home folder open, go to View > Show View Options from the menu bar, or use the keyboard shortcut Command-J. At the bottom of the View Options window, check the box labeled Show Library Folder and then close the window with the red close button in the upper-left.
You’ll now see your Library folder listed inside your Home folder, where it will remain unless you uncheck the aforementioned option. While many Mac users don’t need to venture into their Library folder (hence why Apple chose to hide it by default), there are indeed many useful maintenance and troubleshooting tasks which require access to it. For those new to the Library folder, check out our.